Creating F# solutions in VSCode from scratch
Now that we have set up our development environment, it’s about time to get started with the coding. In this post we are going to get to know different ways of creating a new F# solution from scratch.
Tools for working with .NET projects:
We’re going to do the following things using those different tools:
- Create a console app
- Create a class library
- Adding a .fs file
- Adding project reference from class lib to console app
- Building
- Running the console app
- Adding NuGet packages
- Adding test project
- Running tests
- Debugging
This will be a 2 part tutorial where we will look at how to do all these steps using two different toolsets, first using the combo Ionide, Forge and Paket and after we do the same thing using dotnet CLI and by hand.
Scaffolding using Ionide, Forge and Paket
1 Create a console app
The first thing you’ll have to do is to create a root folder for your new project and open VSCode in that folder:
$ cd ~/src
$ mkdir MyForgeProject
$ code MyForgeProject
Now you’re going to see a very emtpy VSCode instance without anything in it. Now, to create your project, hit Ctrl+Shift+P and start typing new project.

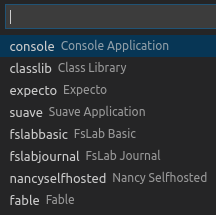
Choose F#: New Project and choose console from the menu that appears.
First, Forge will ask you which folder to put your new project folder in and next the name of your project:


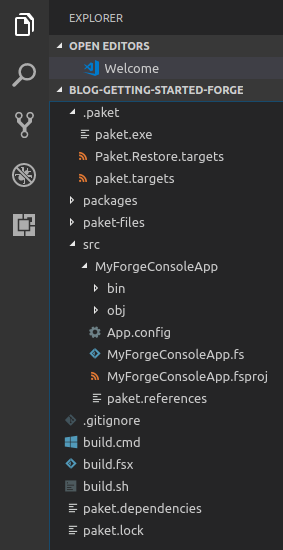
Your project tree will now look like this:
Alternatively use Ionide's F# Project Explorer and press the green plus sign for creating a new project.

The forge template uses Paket for package management and FAKE for build scripting. It also targets .NET Full framework, but we’re going to change that to .NET Core by editing the MyForgeConsoleApp.fsproj file and replacing
<TargetFramework>net461</TargetFramework>
with
<TargetFramework>netcoreapp2.0</TargetFramework>
Paket is also restricted to resolving >= net461 dependencies, but we’ll have to remove that, since we’re now on .NET Core. Open the paket.dependencies file and remove the line:
framework: >= net461
Your paket.dependencies file should now look like this:
source https://www.nuget.org/api/v2

nuget FSharp.Core

group Build
source https://www.nuget.org/api/v2

nuget FAKE
Since the framework restriction is now removed, you have to update the paket.lock file by calling Paket install via the Ctrl+Shift+P menu in VSCode.

2 Create a class library
To create a class library, open the VSCode Command palette (Ctrl+Shift+P) and choose F#: New Project or press the green plus, but this time choose classlib in the menu. Choose src as Project folder and MyForgeClasslib as Project name. Again, it targets net461, so go to src/MyForgeClasslib/MyForgeClasslib.fsproj and replace the full framework target with a netstandard target, since this is a class lib and not a console app:
<TargetFramework>net461</TargetFramework>
with
<TargetFramework>netstandard2.0</TargetFramework>
3 Adding a .fs file
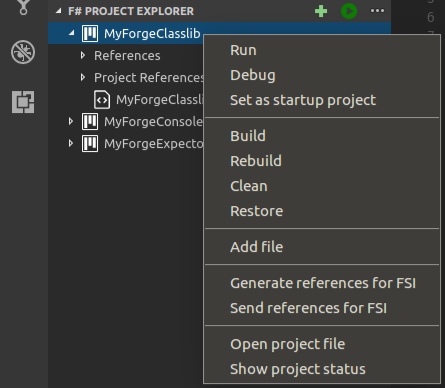
Ionide has a menu for manipulating projects. Simply right-click the project you want to add a file to and select Add file
and choose a name

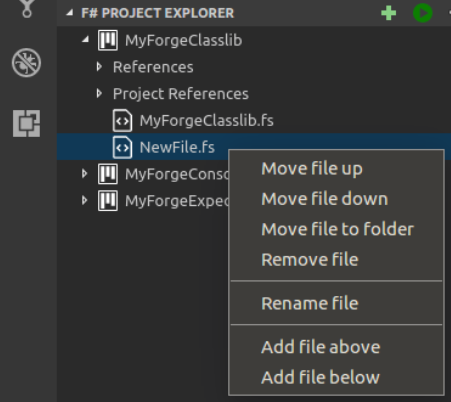
Since F# cares about the order of the files in your project, Ionide supports moving files up or down by right-clicking the file in the F# project explorer:
Please note that F# script files (.fsx) are not shown in the F# project explorer, but still might influence this command by standing “in the way” if they are included in the .fsproj file. Have the .fsproj file open while doing this and see what happens.
4 Adding a project reference
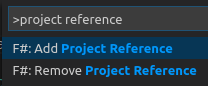
Now we want to add a project reference to the classlib in our console app. Open the VSCode Command palette (Ctrl+Shift+P) and write project reference and choose F#: Add Project Reference.
This will first ask you which project to edit and next the which project to reference. Choose the console app and classlib respectively.
Alternatively, right click Project References under MyForgeConsoleApp in the F# Project Explorer pane.
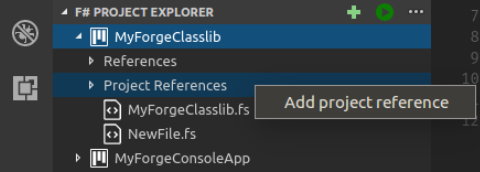
and you will be asked which project to reference.
Forge will now update your MyForgeConsoleApp.fsproj with a <ProjectReference>. Now you can go to your MyForgeConsoleApp.fs and replace it with the following contnet:
module MyForgeConsoleApp

open MyForgeClasslib

[<EntryPoint>]
let main argv =
    let x = MyForgeClasslib()

    printfn "%A" x.X
    0 // return an integer exit code
5 Building
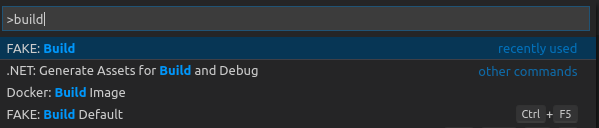
There might be some red errors under the MyForgeClasslib entries, which means that we’ll have to build our project to get everything working. Since this template uses FAKE to build, run it by opening the VSCode Command palette (Ctrl+Shift+P) and writing build and selecting FAKE: Build Default or just pressing Ctrl+F5 as you can see here:
This should eventually give you a Build Time Report and Status: Ok. You might still see some red error markers under open MyForgeConsoleApp. If don’t dissapear by themselves after a little while, try opening your VSCode Command palette (Ctrl+Shift+P) and choose Reload window.
6 Running
Ionide can run the project for you. First you have to set your startup project by right clicking the project you want to debug. Set the MyForgeConsoleApp project as startup project and press the round green icon with a play sign inside. This will actually run it in debug mode.
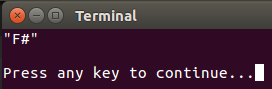
This should open a terminal and show the output of the applicaion.
7 Adding NuGet packages
Now lets add the console app arguments parser Argu to our console app. First, open the project file to add it to by right clicking MyForgeConsoleApp in F# Project Explorer and choose Open project file from the menu. Then open the VSCode Command palette (Ctrl+Shift+P) and write add nuget package and choose Paket: Add NuGet Package (to current project) and write Argu in the box that appears. Tada! You can now add open Argu to the MyForgeConsoleApp.fs file and start parsing arguments.
8 Adding a test project
In the F# world, Expecto is the testing lib to use and Forge has a project template for that. Press the green plus in F# Project Explorer and choose expecto. Put it in tests folder and call it MyForgeExpecto. Change the <TargetFramework> to netcoreapp2.0 in the MyForgeExpecto.fsproj file. If you get any weird issues, try running Paket install again to update your paket.lock file.
9 Running tests
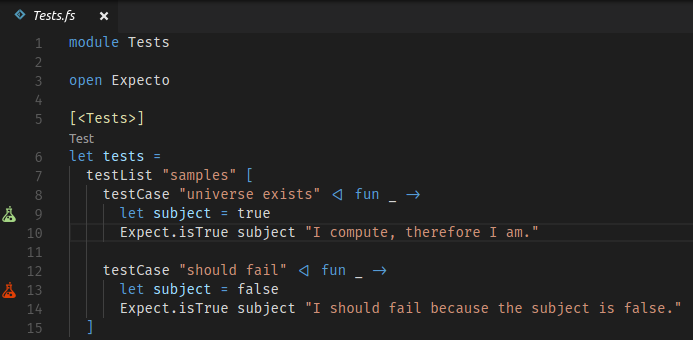
Ionide has buit in support for Expecto, so simply open VSCode Command palette (Ctrl+Shift+P) and write expecto and choose Expecto: Run or press Ctrl+F6. If you open the Tests.fs file you will now see a green and a red chemistry bottle type thing next to the passing and failing test respectively.
10 Debugging
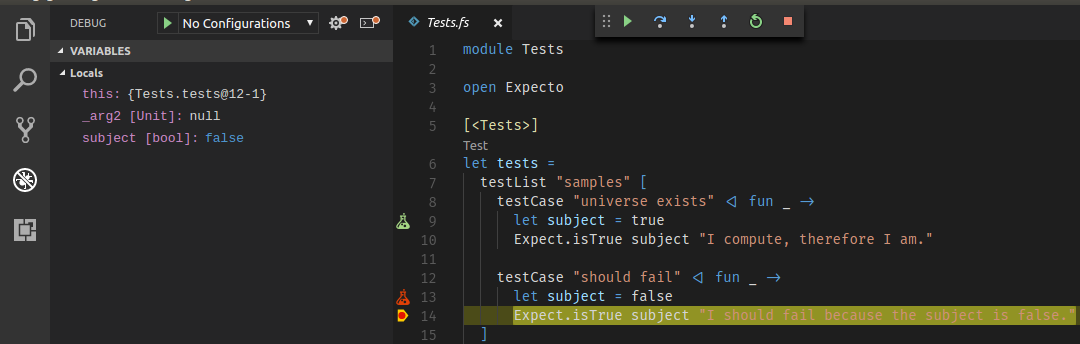
Ionide has build in support for debugging. First you have to set your startup project by right clicking the project you want to debug. Set the MyForgeExpecto project as startup project, add a breakpoint on line 14 in Tests.fs (by clicking right below the red bottle) and press the round green icon with a play sign inside:
If you also press the debug icon in VSCode's sidebar, you should see the following:
Now you should hopefully be able to scaffold your own projects using Ionide and VSCode and start hacking.
Scaffolding using dotnet CLI
1 Creating a console app
Again, create the root folder for your new project and open VSCode.
$ cd ~/src
$ mkdir MyProject
$ code MyProject
Now hit Ctrl+` to open the integrated terminal, which is a great way to keep your CLI and code in the same window. Now check out which templates you have installed by typing:
$ dotnet new
...
Templates                                         Short Name       Language          Tags
----------------------------------------------------------------------------------------------------------------------------
Console Application                               console          [C#], F#, VB      Common/Console
Class library                                     classlib         [C#], F#, VB      Common/Library
SAFE-Stack Web App v0.4.0                         SAFE             F#                F#/Web/Suave/Fable/Elmish/Giraffe/Bulma
Simple Fable App                                  fable            F#                Fable
Unit Test Project                                 mstest           [C#], F#, VB      Test/MSTest
xUnit Test Project                                xunit            [C#], F#, VB      Test/xUnit
ASP.NET Core Empty                                web              [C#], F#          Web/Empty
ASP.NET Core Web App (Model-View-Controller)      mvc              [C#], F#          Web/MVC
ASP.NET Core Web App                              razor            [C#]              Web/MVC/Razor Pages
ASP.NET Core with Angular                         angular          [C#]              Web/MVC/SPA
ASP.NET Core with React.js                        react            [C#]              Web/MVC/SPA
ASP.NET Core with React.js and Redux              reactredux       [C#]              Web/MVC/SPA
ASP.NET Core Web API                              webapi           [C#], F#          Web/WebAPI
global.json file                                  globaljson                         Config
NuGet Config                                      nugetconfig                        Config
Web Config                                        webconfig                          Config
Solution File                                     sln                                Solution
Razor Page                                        page                               Web/ASP.NET
MVC ViewImports                                   viewimports                        Web/ASP.NET
MVC ViewStart                                     viewstart                          Web/ASP.NET
...
We’re going to create an F# Console Application by typing:
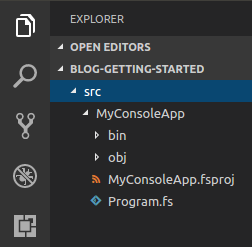
$ dotnet new console -lang F# -o src/MyConsoleApp
This will create the following tree of files:
2 Create a class library
Next we’re going to create a library project we can use from our awesome console app.
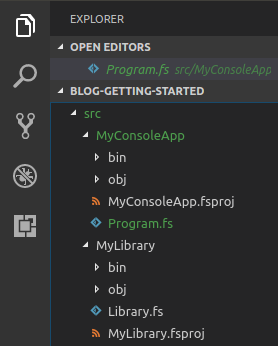
$ dotnet new classlib -lang F# -o src/MyLibrary
The template "Class library" was created successfully.
and your files tree should now look like this:
3 Adding a .fs file
Adding a new file to a project is as simple as right-clicking the folder you want to add it to and select New File.
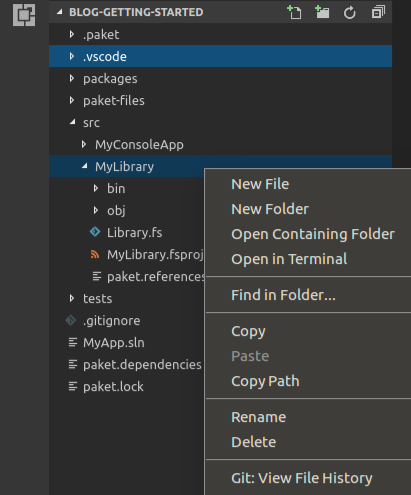
Just call it NewFile.fs and we’ll have to manually add it to the .fsproj file above or below the existing file.
  <ItemGroup>
    <Compile Include="Library.fs" />
    <Compile Include="NewFile.fs" />
  </ItemGroup>
Now you’ll have to add some code to NewFile.fs to not break the build. E.g.:
module NewFile

    let add2 x = 2 + x
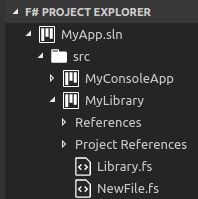
Now, the VSCode explorer doesn’t take this file ordering into consideration. For that you’ll have to look at Ionide’s F# Project Exploerer.
4 Adding project reference
By hand
With the new MSBuild SDK, it’s actually possible to edit .*proj files by hand. Now add a <ProjectReference> to your MyLibrary.fsproj in your MyConsoleApp.fsproj, which will now look like this:
<Project Sdk="Microsoft.NET.Sdk">

  <PropertyGroup>
      <OutputType>Exe</OutputType>
      <TargetFramework>netcoreapp2.0</TargetFramework>
  </PropertyGroup>

  <ItemGroup>
      <Compile Include="Program.fs" />
  </ItemGroup>

  <ItemGroup>
      <ProjectReference Include="..\MyLibrary\MyLibrary.fsproj" />
  </ItemGroup>

</Project>
With dotnet CLI
If you’d rather use dotnet CLI, the command works like this:
$ dotnet add <ProjectToAddReferenceTo> reference <ProjectToReference>
So in our case we will run the following from the root directory:
$ dotnet add src/MyConsoleApp/MyConsoleApp.fsproj reference src/MyLibrary/MyLibrary.fsproj
Reference `..\MyLibrary\MyLibrary.fsproj` added to the project.
5 Building
The dotnet CLI build command supports .sln files (we will create one later) or individual .*proj files. To build our console app, type the following:
$ dotnet build src/MyConsoleApp/MyConsoleApp.fsproj
This will create a bunch of files in src/MyConsoleApp/bin/Debug/netcoreapp2.0/. As you can see, .NET Core console apps aren’t by default compiled to an executable, but rather a .dll you have to run using dotnet CLI.
Building as a self-contained executable
.NET Core also supports compiling self-contained executables for a given runtime. Change the <PropertyGroup> of your MyConsoleApp.fsproj file to this:
  <PropertyGroup>
    <OutputType>Exe</OutputType>
    <TargetFramework>netcoreapp2.0</TargetFramework>
    <RuntimeIdentifiers>ubuntu.16.04-x64</RuntimeIdentifiers>
  </PropertyGroup>
Now you can build your self-contained app by typing this:
$ dotnet publish -c Release -r ubuntu.16.04-x64
Now take a look in src/MyConsoleApp/bin/Release/netcoreapp2.0/ubuntu.16.04-x64/. There you have a MyConsoleApp executable for Ubuntu!
6 Running
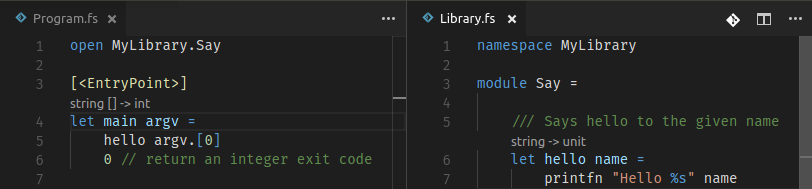
Now that we have added a reference to the class library, we can try to use it. Open Program.fs and Library.fs and change the code to something like this and build it again:
With dotnet CLI
We now have three ways of running the console app using the command line:
dotnet run-p src/MyConsoleApp/MyConsoleApp.fsproj <args>dotnetsrc/MyConsoleApp/bin/Debug/netcoreapp2.0/MyConsoleApp.dll <args>- src/MyConsoleApp/bin/Release/netcoreapp2.0/ubuntu.16.04-x64/
MyConsoleApp<args>
So for example:
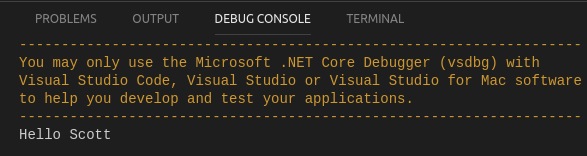
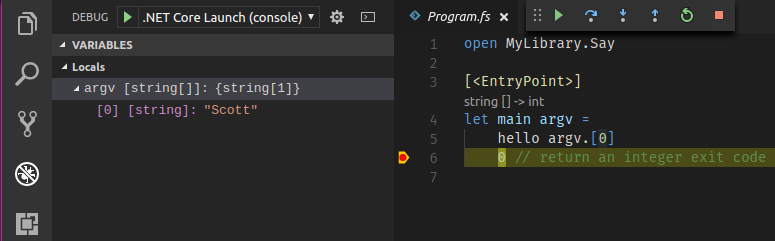
$ dotnet run -p src/MyConsoleApp/MyConsoleApp.fsproj Scott
Hello Scott
With VSCode
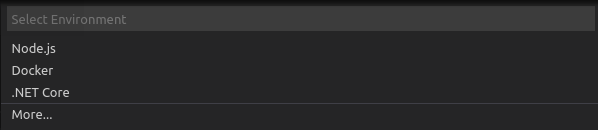
Press F5 and you will see the following menu popping up where you should select .NET Core:
This will create a folder called .vscode with a file called launch.json with the following content (and then some).
"version": "0.2.0",
    "configurations": [
        {
            "name": ".NET Core Launch (console)",
            "type": "coreclr",
            "request": "launch",
            "preLaunchTask": "build",
            "program": "${workspaceFolder}/bin/Debug/<insert-target-framework-here>/<insert-project-name-here>.dll",
            "args": ["Scott"],
            "cwd": "${workspaceFolder}",
            "console": "internalConsole",
            "stopAtEntry": false,
            "internalConsoleOptions": "openOnSessionStart"
        },
You’ll have to add /src/MyConsoleApp and edit the <insert-target-framework-here> and <insert-project-name-here> to the target framework in the MyConsoleApp.fsproj file and the name of the console app dll itself. To get the same output as above, add Scott to the args entry :
"program": "${workspaceFolder}/src/MyConsoleApp/bin/Debug/netcoreapp2.0/MyConsoleApp.dll",
"args": ["Scott"],
Press F5 again and you will get the following popup:
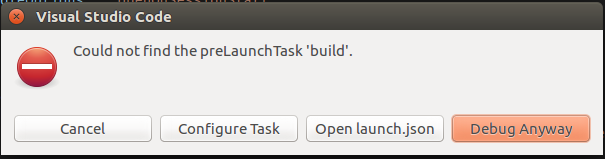
Choose Configure Task and VSCode will show you the following:

Just press enter, since there is only one option, and in the following menu, choose .NET Core.
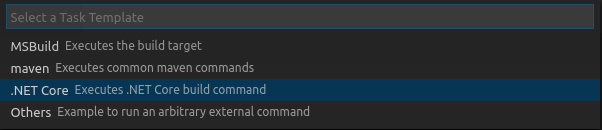
This will create a tasks.json file next to the launch.json file in the .vscode folder, looking like this:
{
    "version": "2.0.0",
    "tasks": [
        {
            "label": "build",
            "command": "dotnet build",
            "type": "shell",
            "group": "build",
            "presentation": {
                "reveal": "silent"
            },
            "problemMatcher": "$msCompile"
        }
    ]
}
If you try to hit F5 again now, the build will fail, since there is no project defined. To fix this, add the MyConsoleApp.fsproj to the command:
"command": "dotnet build src/MyConsoleApp/MyConsoleApp.fsproj",
Now you should be able to press F5 and see the following in the built-in terminal:
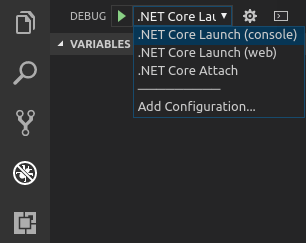
If you like buttons, you could also go to the Debug pane in VSCode which now will list all configs in the launch.json file (which you can open by pressing that cogwheel) and press the green play button:
Now you can set breakpoints in your code and debug your (maybe first) .NET Core F# project in VSCode. How cool is that!
7 Adding NuGet reference
Now we’re going to add an arguments parser to our console app from NuGet. The goto arguments parser for F# is Argu.
By hand
Again, with the new MSBuild SDK, adding a NuGet package is as simple as adding a <PackageReference> to Argu in your MyConsoleApp.fsproj, which will now look like this:
<Project Sdk="Microsoft.NET.Sdk">

  <PropertyGroup>
    <OutputType>Exe</OutputType>
    <TargetFramework>netcoreapp2.0</TargetFramework>
    <RuntimeIdentifiers>ubuntu.16.04-x64</RuntimeIdentifiers>
  </PropertyGroup>

  <ItemGroup>
    <Compile Include="Program.fs" />
  </ItemGroup>

  <ItemGroup>
    <ProjectReference Include="..\MyLibrary\MyLibrary.fsproj" />
  </ItemGroup>

  <ItemGroup>
    <PackageReference Include="Argu" Version="5.0.1" />
  </ItemGroup>

</Project>
Now do a $ dotnet restore src/MyConsoleApp/MyConsoleApp.fsproj. If you are getting a warning like Detected package downgrade: FSharp.Core, add a <PackageReference> to FSharp.Core in the same <ItemGroup> as Argu, matching at least the minumum version required by Argu:
  <ItemGroup>
    <PackageReference Include="FSharp.Core" Version="4.3.2" />
    <PackageReference Include="Argu" Version="5.0.1" />
  </ItemGroup>
With dotnet CLI
dotnet CLI has a command for installing NuGet packages which looks like this:
$ dotnet add <ProjectToAddNuGetTo> package <NuGetPackageId>
So to add Argu to our console app we just type:
$ dotnet add src/MyConsoleApp/MyConsoleApp.fsproj package Argu
To fix the potential Detected package downgrade: FSharp.Core issue, you should in theory just run $ dotnet add src/MyConsoleApp/MyConsoleApp.fsproj package FSharp.Core, however, for me it fails with an error. So you’ll have to add FSharp.Core by hand in the MyConsoleApp.fsproj file as mentioned above or switch to Paket as explained below.
With Paket
Paket is an F# community open source package manager which fixes a lot of the issues NuGet has, e.g. global paket.dependencies and paket.lock files which globally defines which packages and versions are to be used and much more. First, download the paket.bootstrapper.exe and save it as <SolutionFolder>/.paket/paket.exe (yes, you are renaming it. See here for more info).
If you haven’t already added any packages, run the following to get started with Paket and add the Argu package to the MyConsoleApp project:
$ mono .paket/paket.exe init
$ mono .paket/paket.exe add --project src/MyConsoleApp/MyConsoleApp.fsproj Argu
If you’re already using NuGet and want to switch to Paket, run the following command and Paket will figure out which NuGet packages you are using and initialize itself accordingly:
$ mono .paket/paket.exe convert-from-nuget
Paket won’t give you the Detected package downgrade: FSharp.Core issue mentioned above, since it, by default, resolves the higest versions of transient dependencies, unlike NuGet which does the opposite. Paket also automatically hooks into dotnet restore, so you won’t have to do mono .paket/paket.exe restore to restore your packages when using Paket with dotnet CLI.
8 Adding a test project
In F#, Expecto is the goto project for unit-testing. There are two ways to set up a testing project using Expecto. By hand or by dotnet CLI template.
With dotnet CLI
First you need to create a console app, since Expecto is just a library that you can run from console. The second thing you’ll have to do is to add the Expecto NuGet package.
$ dotnet new console -lang F# -o tests/MyTests
$ dotnet add tests/MyTests/MyTests.fsproj package Expecto
$ dotnet restore tests/MyTests/MyTests.fsproj
Replace the contents of Program.fs with the following:
open Expecto

[<EntryPoint>]
let main argv =
    Tests.runTestsInAssembly defaultConfig argv
With dotnet CLI template
As you saw earlier, dotnet new did not show any template for Expecto, however, someone has created this for us. To install it type the following:
$ dotnet new -i Expecto.Template::*
...
...
Templates                                         Short Name       Language          Tags
----------------------------------------------------------------------------------------------------------------------------
Console Application                               console          [C#], F#, VB      Common/Console
Class library                                     classlib         [C#], F#, VB      Common/Library
SAFE-Stack Web App v0.4.0                         SAFE             F#                F#/Web/Suave/Fable/Elmish/Giraffe/Bulma
Simple Fable App                                  fable            F#                Fable
Expecto .net core Template                        expecto          F#                Test
Unit Test Project                                 mstest           [C#], F#, VB      Test/MSTest
xUnit Test Project                                xunit            [C#], F#, VB      Test/xUnit
ASP.NET Core Empty                                web              [C#], F#          Web/Empty
ASP.NET Core Web App (Model-View-Controller)      mvc              [C#], F#          Web/MVC
ASP.NET Core Web App                              razor            [C#]              Web/MVC/Razor Pages
ASP.NET Core with Angular                         angular          [C#]              Web/MVC/SPA
ASP.NET Core with React.js                        react            [C#]              Web/MVC/SPA
ASP.NET Core with React.js and Redux              reactredux       [C#]              Web/MVC/SPA
ASP.NET Core Web API                              webapi           [C#], F#          Web/WebAPI
global.json file                                  globaljson                         Config
NuGet Config                                      nugetconfig                        Config
Web Config                                        webconfig                          Config
Solution File                                     sln                                Solution
Razor Page                                        page                               Web/ASP.NET
MVC ViewImports                                   viewimports                        Web/ASP.NET
MVC ViewStart
Now you’ll se a new template called Expecto .net core Template that we will create by typing:
$ dotnet new expecto -o tests/MyTests
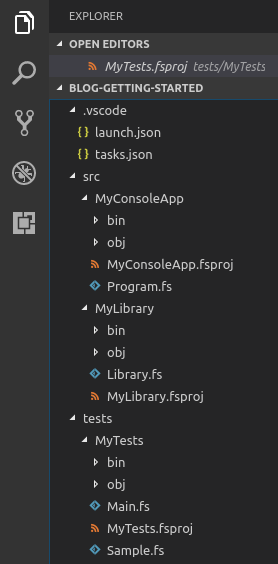
Your tree will now look something like this:
9 Running tests and debugging
Using dotnet CLI
Running the Expecto tests is as simple as running the console app created by the dotnet CLI template, like this:
$ dotnet run -p tests/MyTests/MyTests.fsproj
[21:17:53 INF] EXPECTO? Running tests... <Expecto>
...
...
[21:18:06 INF] EXPECTO! 8 tests run in 00:00:00.2157219 – 2 passed, 1 ignored, 5 failed, 0 errored. ( ರ Ĺ̯ ರೃ ) <Expecto>
Using VSCode
Now you’ll have to configure a build task and launch parameters for the Expecto project by first pressing the cogwheel here:
which opens launch.json. Add the following to the list of configurations:
{
    "name": ".NET Core Launch (tests)",
    "type": "coreclr",
    "request": "launch",
    "preLaunchTask": "build-tests",
    "program": "${workspaceFolder}/tests/MyTests/bin/Debug/netcoreapp2.0/MyTests.dll",
    "args": [""],
    "cwd": "${workspaceFolder}",
    "console": "internalConsole",
    "stopAtEntry": false,
    "internalConsoleOptions": "openOnSessionStart"
},
Here we have changed the name, preLaunchTask and the program entries. Now your list of debug targets should look like this:
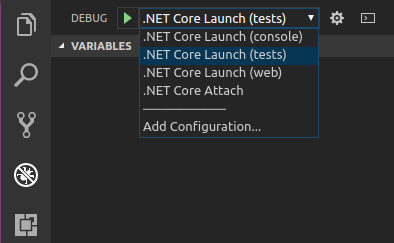
Now select the .NET Core Lunch (tests) entry and press the green play button and you will get a popup saying Could not find the preLaunchTask 'build-tests'.
Just select Configure Task again and choose build in the next popup, which will open the tasks.json again. Now add the following task to the list of tasks:
{
    "label": "build-tests",
    "command": "dotnet build tests/MyTests/MyTests.fsproj",
    "type": "shell",
    "group": "test",
    "presentation": {
        "reveal": "silent"
    },
    "problemMatcher": "$msCompile"
}
As you can see, the label matches the preLaunchTask in launch.json. Now try running the .NET Core Lunch (tests) again and Expecto should now start in debug mode.
But where is the solution file?
With .NET Core and dotnet CLI the .sln file is not really necessary anymore, however, it is still supported and it can make the workflow a bit simpler by having dotnet CLI just run the .sln instead of having to point to the specific .*proj files for building. So, to create a solution file we must do the following:
- Create the solution file
- Add all projects to it
Both can be done using dotnet CLI like this:
$ dotnet new sln -n MyApp
$ dotnet sln add src/MyConsoleApp/MyConsoleApp.fsproj src/MyLibrary/MyLibrary.fsproj tests/MyTests/MyTests.fsproj
Project `src/MyConsoleApp/MyConsoleApp.fsproj` added to the solution.
Project `src/MyLibrary/MyLibrary.fsproj` added to the solution.
Project `tests/MyTests/MyTests.fsproj` added to the solution.
Now to build the application, simply type the following from the root folder of your solution (where the MyApp.sln file is located):
$ dotnet build
Now you can go into tasks.json and replace the two separate build and build-tests tasks with a single default one which looks like this:
{
    "label": "build",
    "command": "dotnet build",
    "type": "shell",
    "group": "build",
    "presentation": {
        "reveal": "silent"
    },
    "problemMatcher": "$msCompile"
}
See that the project path is removed from the command. Now you can open launch.json and change the preLaunchTasks for both configurations to the same build task.
{
    "name": ".NET Core Launch (console)",
    "type": "coreclr",
    "request": "launch",
    "preLaunchTask": "build",
    "program": "${workspaceFolder}/src/MyConsoleApp/bin/Debug/netcoreapp2.0/MyConsoleApp.dll",
    "args": ["Scott"],
    "cwd": "${workspaceFolder}",
    "console": "internalConsole",
    "stopAtEntry": false,
    "internalConsoleOptions": "openOnSessionStart"
},
{
    "name": ".NET Core Launch (tests)",
    "type": "coreclr",
    "request": "launch",
    "preLaunchTask": "build",
    "program": "${workspaceFolder}/tests/MyTests/bin/Debug/netcoreapp2.0/MyTests.dll",
    "args": [""],
    "cwd": "${workspaceFolder}",
    "console": "internalConsole",
    "stopAtEntry": false,
    "internalConsoleOptions": "openOnSessionStart"
}
So the .sln file can actually be quite useful.
This ended up being quite long, but I hope you learned something along the way. So now you should be able to create great F# apps using VSCode on any platform using dotnet CLI and Ionide. See, it even has menus and a Play button!